   And that's the story of this dress! Although in its 60 years of existence it's probably had a lot more interesting stories about it than that one. But it's the garment that got me into wearing vintage clothes so it's pretty special to me!
wearing
I hope you're all having a beautiful week.
xxx Annika |

Tuesday 31 July 2012
My favourite dress
Sunday 29 July 2012
Red, Orange, Polka Dots
    
wearing
dress - "Baking Soda" (from Japan)
collar tips - Paddy's Markets
bag - Vintage
belt - Vintage
tights - Wholesale
shoes - ASOS
OH. EM. GEE. I am not wearing my boater hat. This is rare. Whenever I am taking photos I end up going "eeehhh this would look better with a boater hat" basically 99% of the time, but I stopped myself for reaching for my hat today! What do you think of my naked head ;)? Haha.
This dress is close to my favourite dress ever. I got it in Japan and wore it out to a music performance that night, so whenever I wear it I am flooded with memories of Tokyo. Ahh, I want to go back to Japan so badly. Can you all please make my blog super famous so I can go back over there on a... fashion... trip or something? Pleeeease? Just tell all your friends and your friends friends about me, maybe make some posters with my face on it and put them up around your town. Or you could even hire an aeroplane to write my blog URL in the sky. Just some ideas, guys. Then I can be famous, and go back to Japan. Pretty please with sugar on top? Thanks :)
Hope you're all having a marvelous Sunday! And enjoying watching the olympics too, possibly. I was of the "I'm so
not going to watch the olympics it's sooo boring and a waste of money
bleh bleh" crowd, but this morning I basically bit off all my nails
watching the women's weightlifting finals and burst into tears when the
Japanese contestant got a silver medal (because her dad was her coach and previous bronze metal winner and she made him so proud haha). Sooo yeah. I've changed my mind.
The olympics is kind of the best ever. (Mum, I know you're reading this. So shuush, okay.)
xxx Annika
|
Saturday 28 July 2012
Like Trying to get Honey from a Stone
    

wearing
dress - c/o Oasap
bag - Vintage
cardigan - No Brand
belt - c/o Mochi Beaucoup
socks - Vintage
shoes - Vintage
hat - c/o Wholesale
I flipping love this new dress. I think after pastels, shades of light brown and beige are my favourite colours to wear. And this dress has polka dots. And a damn cute collar. Ahh... love...
p.s. The fantastic song which is the title of this look can be found here.
xxx Annika
|
Friday 27 July 2012
DIY Knicker Shorts
I thought I'd only have one DIY to show you this week, but I actually have two! Last night I discovered this amazing blog (link now dead) and on it, a tutorial of how to make shorts.  
  
blouse - c/o OASAP
blouse #2 - Paper Scissors
shorts - DIY
bag - c/o Wholesale
bag #2 - DIY
tights - Wholesale
hat - c/o Wholesale
shoes - Rubi Shoes
.gif)
1. Get a pair of shorts that fit you really well. 2. Fold them in half and trace around them onto pattern paper (I am cheap and used baking paper, haha). 3. Add about 1cm all around the pattern, then cut it out. 4. Trace the pattern onto your fabric, with the straight edge on the fold. Do this twice. Cut out both. 5. Place pieces front-sides together. Sew all the way up the curved end. 6. Fold up bottom edge on both pieces and hem using an edge stitch. 7. Sew the crotch together by sewing where the dotted line is in the picture. 8. Make your waistband by folding the waist down (just a bit longer than your elastic is wide). Sew all around, leaving a 2cm gap where you will be putting your elastic in. 9. Wrap the elastic around your waist, and take off about 5cm. Attach a safety pin to the end of your elastic. Pull it through the waistband, sew the ends of the elastic together, then sew up the hole.
EDIT: When making the pattern, make the waist a little larger than it is on your shorts that you are tracing (so that you can actually get them on). The elastic will stop them from being too big. Also learning how to do darts can help give the shorts a better shape... and avoid bunching! I added darts in these DIY shorts here and they fit a lot better. Sorry I don't have any DIY for that yet, try and find something on google if you're curious!
So that's what I did for my first pair of shorts, which were not knicker shorts (and have now become pyjama pants). For the second pair (the pair I am wearing in the photos) I altered the DIY slightly. You have to be careful here because knicker shorts should not be underwear. I even have a scale.
  .jpg)
This is such a quick and easy DIY, I think I'm going to make about a bazillion more pairs! I need to get myself some shiny, stretchy fabric...
xxx Annika
|
Thursday 26 July 2012
DIY Satchel Bag #2 - Using one belt

I've been having a lot of fun making satchel bags after I figured out how to make them back in this post. This one was slightly different, so if you want full instructions go here, but here's the little summary of this DIY.

1. Get your fabric. Mine was a weird old heavy canvas jacket. 2. Make two identical rectangles. 3. Make two side-strips and one bottom-strip. 4. Join them all up into a pouch. 5. Make a front-flap (using different fabric for the front of the flap) and attach it to the back of the bag. 6. Place your belt on your bag and sew it securely onto the front flap. 7. I then used a pocket from the coat and put it on the front of my bag so it had an extra embellishment. 8. I added a strap which was just an old fabric belt. But you could make a strap by cutting a strip of fabric, folding over and sewing the raw edges together, flipping it inside out and then sewing it onto the sides of the bag.

Good luck to anyone who gives making a satchel bag a go, and please email me a photo if you do!
xx Annika
|
Tuesday 24 July 2012
Bright Pastels
   
wearing
blouse - Paper Scissors
sweater clips - DIY
bag - c/o Wholesale
hat - c/o Wholesale
jeans - Unknown (a store in Sydney...)
socks - Vintage
shoes - Dr Martens
I'm an assortment of pastel colours. And wearing pants. What now - pants?
So today I made a second satchel bag, ya'll see it in my next post ;) (or if you follow my instagram (@littlepineneedle) then you would have seen a sneak peek of it already). Thanks heaps for your encouraging comments on my other DIY satchel bag! One more week to go until I'm back at uni so I'm sewing like a mad woman trying to cram in all the things I wanted to get done. I also attempted to make swimmers from a t-shirt last night.. haha and that was pretty much a failure. If I never show all these failed attempts at projects with you guys though, you'll all keep thinking I'm a sewing whiz who can do no wrong, so I won't show you that ;)
xxx Annika
|
Monday 23 July 2012
DIY Satchel Bag/Backpack
So here's what I made:      
wearing
dress - c/o Oasap
bag - made by me!
tights - c/o Oasap
shoes - Vintage
hat - c/o Wholesale
The colour inspiration for this bag came from this Dangerfield coat:

(source)
Which looks a lot nicer in real life than in this photo, and shall one day be mine. I probably never would have put dark-ish green and brown together if it weren't for seeing this coat the other day.
I also took photos of the process so I could attempt to explain how I made it. It was fairly difficult so I recommend you only try it if you have some sewing experience. Here we go!:
what you need
.jpg)
note: your fabric needs to be thick-ish (i used velvet.)
the belts should be near-identical (mine are just from a charity store, this is a good place for cheap belts)
what you do

Cut two identical rectangles out from your fabric. This will be the front and back of your bag.

Make a strip of fabric for the bottom of your bag. Make it at least two layers thick so that the bottom of your bag is strong.

Sew it onto the bottom of one of your rectangles (the two materials facing each other).

Sew your other rectangle to the opposite edge of the bottom strip.

Make 2 side strips (the same width as the bottom strip) and sew them onto both sides of the main front rectangle.
Sew it all up into a bag-shaped object!
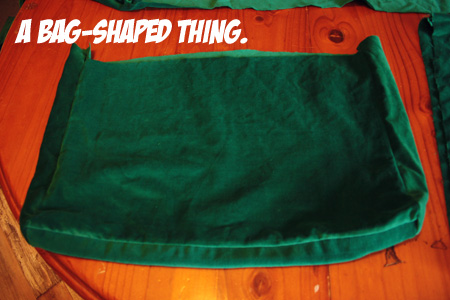 
Now you need to cut out one rectangle of cardboard to the same size as the front of your bag (but this is terrible and you should probably actually use iron-on fusible interfacing instead). This will help give the bag shape. Insert it into the front of the bag.

Cut out a rectangle of fabric of the same size. This will be your inner lining (it'll go over the cardboard).
Flip your bag inside-out.

Place the cardboard inside the front of the bag. Trim it until it fits. Place the lining over the top, then hand-stitch it to the edges of the bag.
 
Make your front flap by cutting out another 2 rectangles (they need to be the same width as the main rectangles but slightly shorter in height, and with rounded edges at one end). Sew them together first (so you have a kind of pocket), then sew this flap to the back edge of the bag.

Use craft glue and thread to attach the straps the the front flap of the bag.

Wrap the belts around the bag, then open up the bottom of the bag (at the back) where the belts need to go inside by flipping it inside-out and cutting the threads. Insert the belt then sew it back up over the top of it.
If your belts were long enough (only one of mine was so I had to use a third belt) then cut off the ends of the belts and do a similar thing to before, but insert them into the bottom of the bag at the front of the bag.
And that's it! I think I will also add a handle to the top and try and make straps for the sides (using another belt - I have so many of these belts, it's a little insane).
I hope you enjoyed this DIY! Can't wait to hear what you think of it!
xxx Annika
|
Subscribe to:
Posts (Atom)